
$ git init    //git初始化
$ git remote add -f origin http://githhub/projectName.git   //添加远程仓库地址
$ git config core.sparsecheckout true    //开启sparse checkout功能
$ echo "fileName" >> .git/info/sparse-checkout   //fileName需要拉去的文件夹名称
$ cat .git/info/sparse-checkout   //查看配置文件信息
$ git pull origin master    //拉取远程哪个分支的文件目录,这里是master上的分支
上海联通dns
默认服务器: ca1.sh.cncnet.net
Address: 210.22.70.3
默认服务器: ca2.sh.cncnet.net
Address: 210.22.84.3
实测,B站解析比用DNSPOD强
F5 BIGIP DNS64 与 NAT64 实验
由于之前的工作原因接触到了 Citrix 设备的 IPv6 to IPv4 配置,得空找了一天时间把相同效果也在 F5 设备上重现一次,比较异同。
实验目的
利用业务现有的 IPv4 DNS 服务器和 F5,把 IPv6 客户端的请求负载到业务现有的 IPv4 服务器上,有两点要求:
- 不改动现有业务服务器的架构,兼容已有 IPv4 应用;
- 新上线 IPv4 应用,能自动完成 IPv6 部署,不需额外配置;
实验原理
IPv6地址
IPv6 地址共有 128 位,最后 32 位通过进制转换可以用来代表一个完整的 IPv4 地址,如:
IPv6地址 2408:bb25:3585:649b:1:0:c0a8:b6e 最后 32 位为 c0a8:b6e
| 十六进制 | c0 | a8 | 0b | 6e |
| 十进制 | 192 | 168 | 11 | 110 |
即最后32位可以代表 IPv4 地址 192.168.11.110 。
DNS64
F5 收到 DNS 请求后,向后端的 DNS 服务器请求对应 A 记录;收到 A 记录后,将其中的 IPv4 地址加上 96 位 IPv6 前缀,形成 AAAA 记录返回给客户端。
NAT64
F5 收到目的地址为特定前缀的 IPv6 地址的请求时,取该地址最后 32 位为负载后的 IPv4 目的地址,处理请求。
实验拓扑
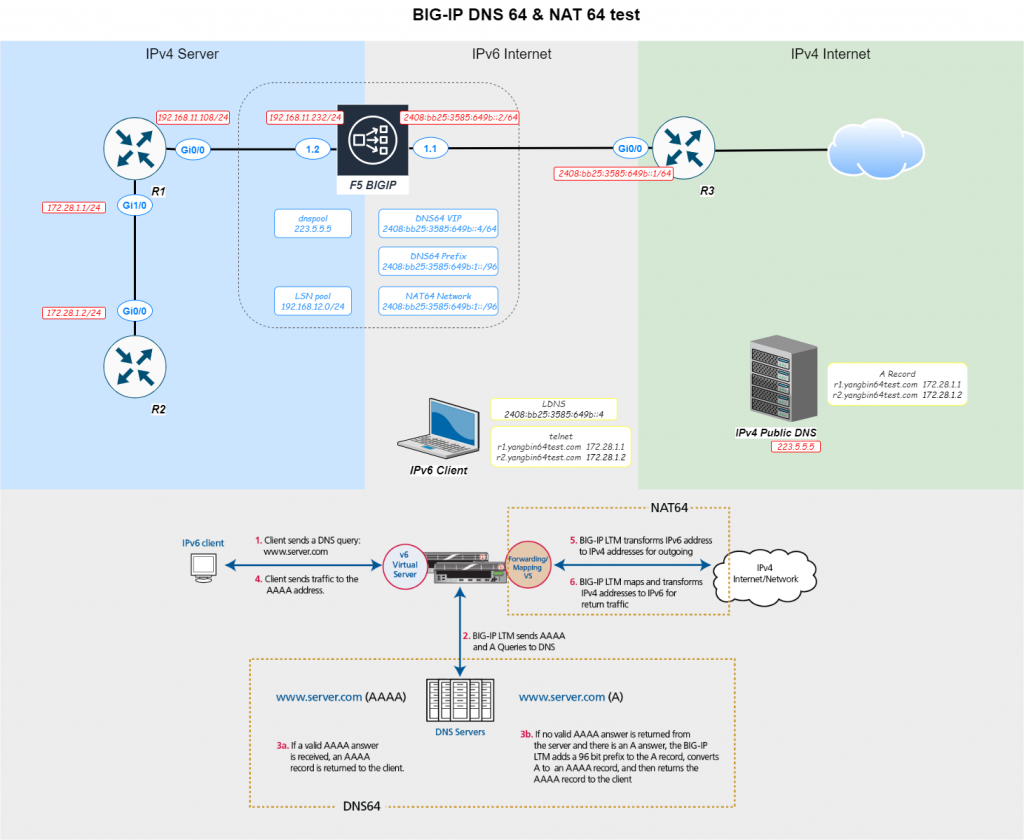
图中央的 IPv6 客户端通过域名,telnet 到左边 IPv4 Server 区域的路由器 R1 和 R2
具体过程如下:
- IPv6 客户端发起 DNS 请求,请求解析 r2.yangbin64test.com
- F5 收到 DNS 请求,向 DNS 服务器请求 A 记录
- DNS 服务器返回 A 记录 172.28.1.2
F5 使用预配置的 96 位地址前缀 2408:bb25:3585:649b:1::/96 ,拼接成 AAAA 记录 2408:bb25:3585:649b:1:0:ac1c:102 返回给客户端 - 客户端收到域名 r2.yangbin64test.com 的 AAAA 记录,向该地址发起连接
- F5 收到连接请求,将 IPv6 地址最后 32 位取出作为负载后目的地址
- F5 将该连接后续返回的 IPv4 数据包再转换成 IPv6 返回给客户端;
环境配置
F5 VE
本实验使用 F5 VE V16 版本,配置 DNS64 和 NAT64 必要的功能 license 有:
- DNS(GTM)
- CGNAT
导入 F5 VE 的 ovf 模版时,建议:
- 选择 8G 及以上内存配置
- 虚拟机第一张网卡选仅主机模式,该网卡会作为管理口
- 虚拟机其他网卡按需选择模式,按顺序为 1.1,1.2,1.3 接口
Vlan 和 Self IP 配置
Vlan:
- outside_6
绑定接口 1.1 - inside_4
绑定接口 1.2
Self IP:
- outside
2408:bb25:3585:649b:0:0:0:2/64 - outside-linklocal
fe80:0:0:0:20c:29ff:fe84:eadc/64 - inside
192.168.11.232/24
F5 路由
default_v6
- ::/0
- 2408:bb25:3585:649b:0:0:0:1
default_v4
- 0.0.0.0/0
- 192.168.11.1
inside_route
- 172.28.0.0/16
- 192.168.11.108
路由器配置
IP为图上所示,这里主要说一下各设备路由条目
R1:
ip route 0.0.0.0 0.0.0.0 192.168.11.1   #IPv4网关不是F5
ip route 192.168.12.0 255.255.255.0 192.168.11.232 #LSN pool
R2:
ip route 0.0.0.0 0.0.0.0 172.28.1.1R3 默认路由指向公网出口
DNS64 配置
这部分完全依照官方文档 Configuring DNS64
本实验 F5 DNS Listener VIP 为 2408:bb25:3585:649b:0:0:0:4
NAT64 配置
这部分参考官方文档 Using NAT64 to Map IPv6 Addresses to IPv4 Destinations
文档中一些步骤需要作如下补充:
- Creating a NAT64 LSN pool
LSN pool 用来负责 NAT64 之后与服务端的连接,在 F5 V16 版本中,要先在 CGNAT的 Option 中,勾选 Legacy LSN Pools Editor,才能配置 LSN pool
本实验中 LSN pool 使用 192.168.12.0/24 - Creating a NAT64 virtual server for an LSN pool
该步骤中第五点,Destination Address,即 VS 的目的地址,在V16中不能直接配置 Network
需要在 Shared Objects > Address Lists 中,预先定义好网段
本实验中 NAT64 VS 入口网段为 2408:bb25:3585:649b:1::/96
测试域名准备
测试域名使用yangbin64test.com
新建如下A记录
- r1.yangbin64test.com 172.28.1.1
- r2.yangbin64test.com 172.28.1.2
- r2new.yangbin64test.com 172.28.1.3
确保使用公众 DNS 能正常解析
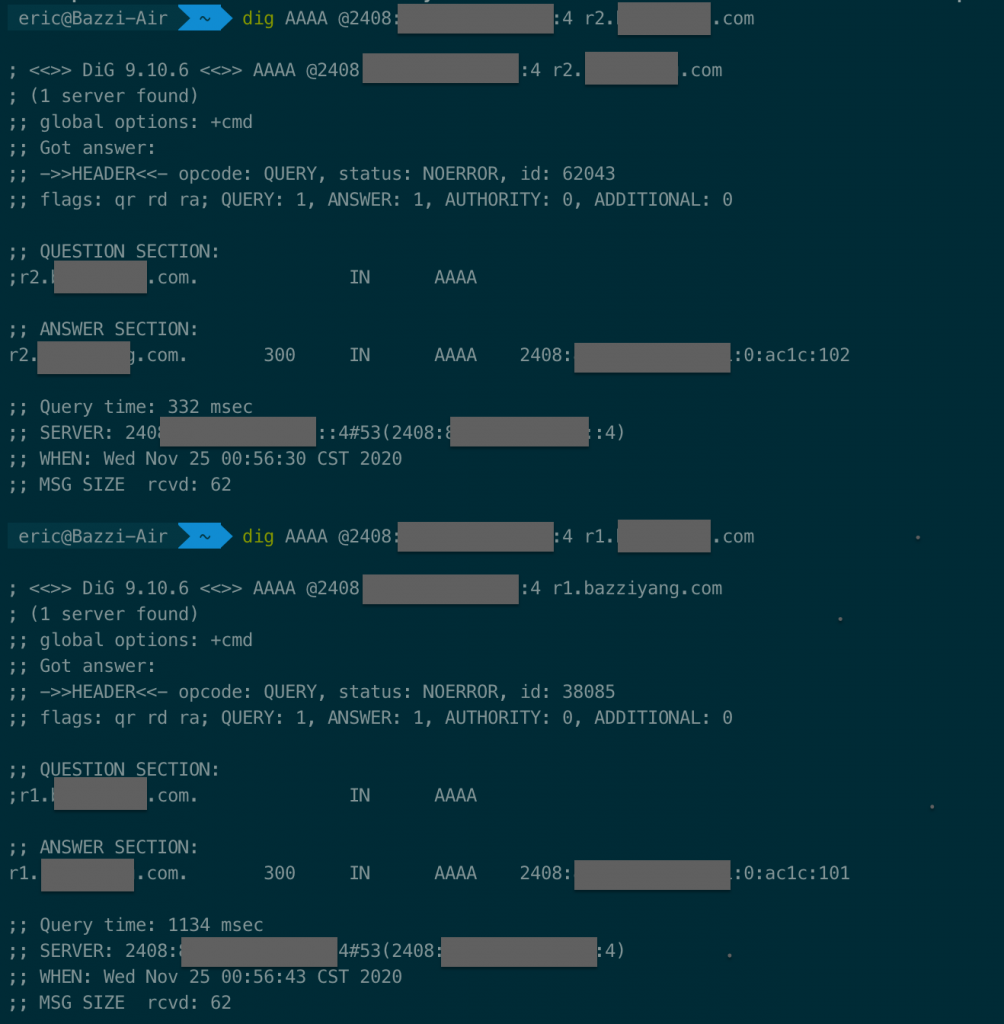
测试过程
- 在纯 IPv6 客户端上,将系统 DNS 设置为 2408:bb25:3585:649b:0:0:0:4 ,解析两个测试域名,结果如下:
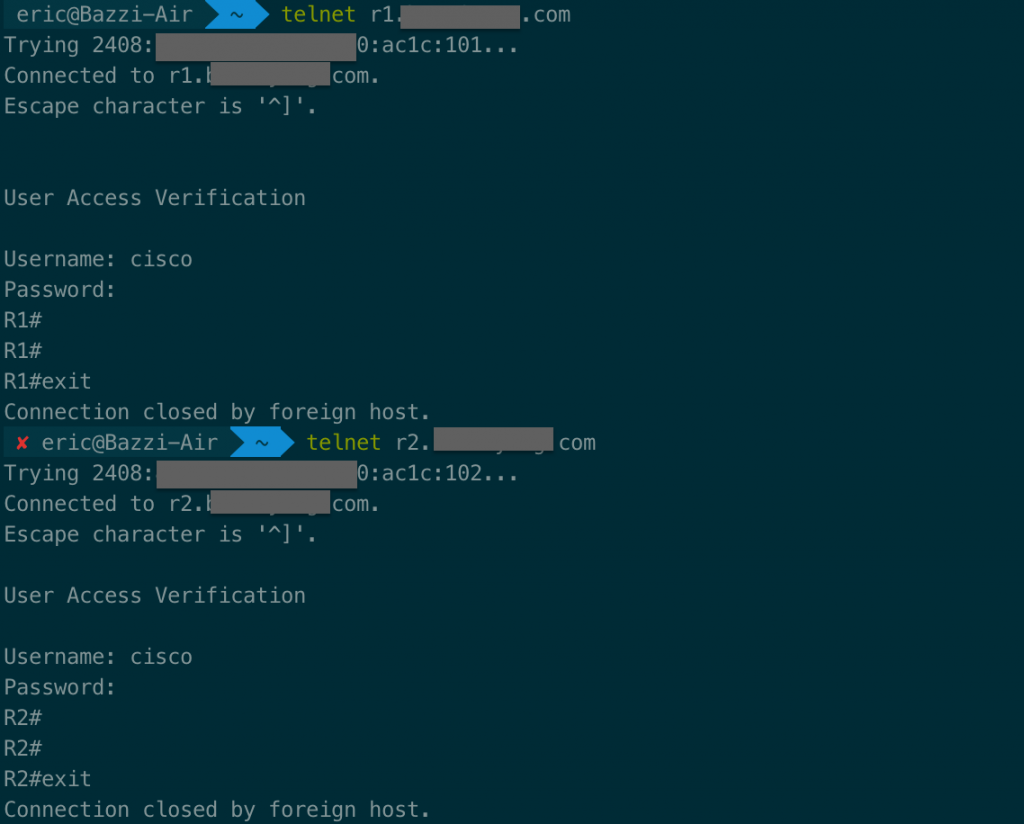
- 继续分别 telnet 两个域名,查看是否能够登陆路由器,结果如下:
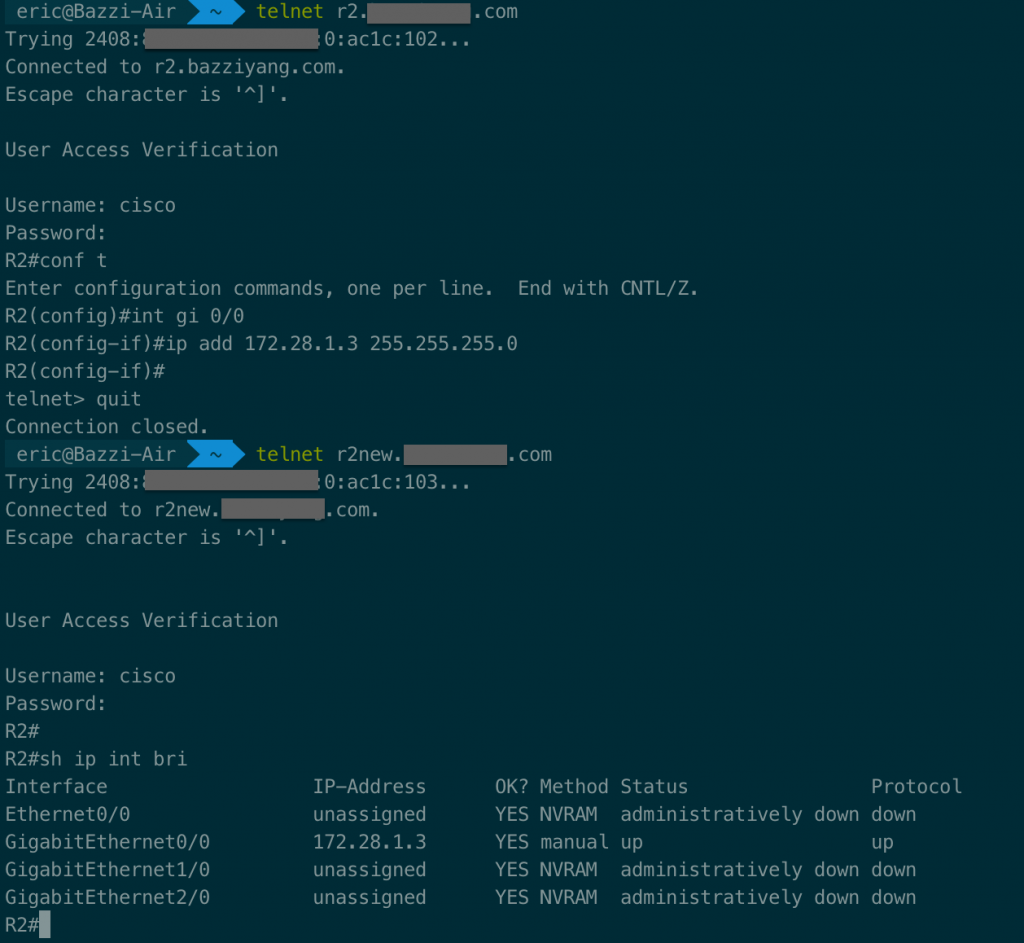
- 将 R2 的 Gi0/0 接口地址改为 172.28.1.3, 在纯 IPv6 客户端上 telnet r2new.yangbin64test.com ,结果如下:
总结
至此, F5 BIG-IP 上 DNS64 和 NAT64 的配置与测试完成。
实际业务场景下,还需要注意:
- 对现有域名系统的 NS 记录作变更(指向 F5 Listener VIP),如此便不需要客户端再指定LDNS;
- 原有业务逻辑涉及SSL的部分仍然需要单独处理,这里不再展开。
DNS64 和 NAT64 依然比不上原生单/双栈的性能 (参考 RFC 6145),从应用角度出发,IPv6 不仅仅是简单扩展了地址空间,还能给开发和基础架构带来全新的设计思路。
扩展阅读
macOS iterm初始化
iTerm初始化环境
#安装oh-my-zsh
sh -c "$(curl -fsSL https://raw.githubusercontent.com/robbyrussell/oh-my-zsh/master/tools/install.sh)"

#安装powerline
curl https://bootstrap.pypa.io/pip/2.7/get-pip.py -o get-pip.py
python get-pip.py
sudo ln -s /Users/Eric/Library/Python/2.7/bin/pip /usr/local/bin/pip
pip install powerline-status --user

#安装字体
mkdir ~/openSource
cd ~/openSource
git clone https://github.com/powerline/fonts.git --depth=1
cd fonts
./install.sh
#iTerm2 -> Preferences -> Profiles -> Text,选择Meslo

#配色
cd ~/openSource
git clone https://github.com/altercation/solarized
cd solarized/iterm2-colors-solarized/
open .
#双击导入,iTerm2 -> Preferences -> Profiles -> Colors -> Color Presets,选择主题

#主题
cd ~/openSource
git clone https://github.com/fcamblor/oh-my-zsh-agnoster-fcamblor.git
cd oh-my-zsh-agnoster-fcamblor/
./install
vi ~/.zshrc
#将ZSH_THEME后面的字段改为agnoster

#代码补全
cd ~/.oh-my-zsh/custom/plugins/
git clone https://github.com/zsh-users/zsh-autosuggestions
vi ~/.zshrc
#zsh-autosuggestions,添加至plugins

#高亮
cd ~/.oh-my-zsh/custom/plugins/
git clone https://github.com/zsh-users/zsh-syntax-highlighting.git
vi ~/.zshrc
#zsh-syntax-highlighting,添加至plugins,一定要写在plugins里的最后
#文件最后一行添加
source ~/.oh-my-zsh/custom/plugins/zsh-syntax-highlighting/zsh-syntax-highlighting.zsh
remove codesign on macOS
remove codesign on macOS due to OCSP
xcode-select --install
codesign --remove-signature /Applications/V2rayU.appMissing Semester
Lecture videos from the class offered during MIT’s Independent Activities Period in 2020.
https://missing.csail.mit.edu/
一些重要的点:
The Shell:
- <
curl --head --silent google.com | grep --ignore-case content-length | cut --delimiter=' ' -f2- tee
Shell Tools and Scripting
- $的各种用法:
$0– Name of the script$1to$9– Arguments to the script.$1is the first argument and so on.$@– All the arguments$#– Number of arguments$?– Return code of the previous command$$– Process Identification number for the current script!!– Entire last command, including arguments. A common pattern is to execute a command only for it to fail due to missing permissions, then you can quickly execute it with sudo by doingsudo !!$_– Last argument from the last command. If you are in an interactive shell, you can also quickly get this value by typingEscfollowed by.- for file in $(ls)
- diff <(ls foo) <(ls bar)
- test [ ] [[ ]] What is the difference between test, [ and [[ ? ( 结论是用 [[ ]] )
- {} 扩展
convert image.{png,jpg}
# Will expand to
convert image.png image.jpg- 可以使用shellcheck
- shebang
- TLDR pages
- find
- rg
- fd
- fish shell
- zsh
- fasd 排序文件
- xargs
Editors(vim)
Data Wrangling
- 正则表达式
- convert
- sed
- awk
- sort
ssh myserver journalctl
 | grep sshd
 | grep "Disconnected from"
 | sed -E 's/.*Disconnected from (invalid |authenticating )?user (.*) [^ ]+ port [0-9]+( \[preauth\])?$/\2/'
 | sort | uniq -c
 | sort -nk1,1 | tail -n10
 | awk '{print $2}' | paste -sd,